介绍
本文介绍如何创建一个迷宫游戏使用HTML5数字计时器(在画布 -element和JavaScript,在不使用闪光灯的)。重要提示:这个迷宫不起作用,如果你的浏览器不支持JavaScript或HTML5(在画布 -element要具体)。如果你下载的迷宫,但如果它不能正常工作,那么在这里尝试在线演示:https://programfox.github.io/HTML5-Maze/ [ ^ ]
另一个重要的注意事项:当我测试的游戏,它在Firefox,Opera和Safari浏览器工作正常脱机和联机。然而,在Chrome和IE浏览器,我不能,如果文件没有被托管移动蓝色的矩形。这是出于安全方面的原因:在文件系统上的每个文件都有不同的产地,并且可以从不同来源文件加载到你的画布(当时它是一个被污染的帆布 [ ^ ]),但如果您尝试使用getImageData()在被感染的画布,你在Chrome和IE安全错误。对于这些浏览器,你应该去在线演示尝试走出迷宫,或者托管在下载的文件本地主机服务器。
下载迷宫后,不要忘记解压缩所有文件(HTML文件和图像),否则迷宫不会出现。
生成迷宫
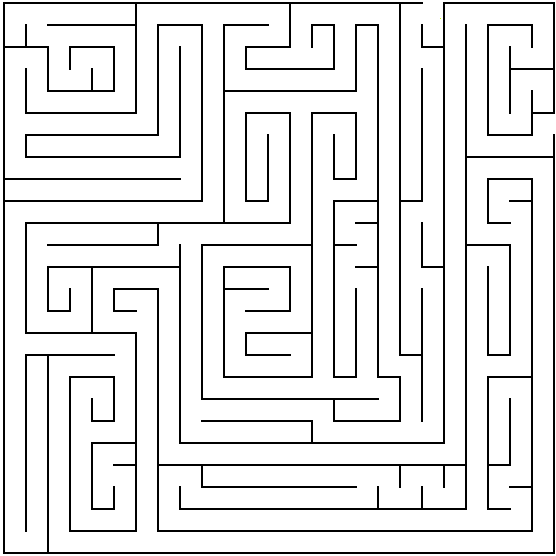
第一步创建一个迷宫,是让迷宫的图像。要创建一个迷宫的形象,我用这个在线迷宫制造者:http://www.hereandabove.com/maze/mazeorig.form.html [ ^ ]
这是迷宫制造者产生哪些迷宫:

定位元素和绘图迷宫画布元素上
定位和绘图
下一步骤是定位而可以用箭头键或WASD移动,到终点(在我的迷宫圆形)定位矩形。在我的迷宫,所述矩形的位置是425,3PX和大小为15像素Ž15像素和该圆的中心点是524px,122px和半径为7像素。首先,你需要创建画布 -element:
<canvas width="616" height="556" id="mazecanvas">Can't load the maze game, because your browser doesn't support HTML5.</canvas>
<noscript>JavaScript is not enabled. To play the game, you should enable it.</noscript>
浏览器会显示“无法加载的迷宫游戏......”如果浏览器不支持HTML5。迷宫的大小是556点¯x556,但我没设置宽度为616,因为我还添加了一个(数字)定时器。下一步骤是将迷宫绘制到画布使用JavaScript -element。我用的drawImage方法来绘制迷宫形象,我用beginPath方法,调用closePath,矩形并填充的方法来绘制矩形,我用beginPath方法,调用closePath,电弧和填充方法绘制圆:
 复制代码
复制代码
var canvas = document.getElementById("mazecanvas");
var context = canvas.getContext("2d");
var currRectX = 425;
var currRectY = 3;
var mazeWidth = 556;
var mazeHeight = 556;
var intervalVar;
function drawMazeAndRectangle(rectX, rectY) {
    makeWhite(0, 0, canvas.width, canvas.height);
    var mazeImg = new Image();
    mazeImg.onload = function () { // when the image is loaded, draw the image, the rectangle and the circle
        context.drawImage(mazeImg, 0, 0);
        drawRectangle(rectX, rectY, "#0000FF", false, true);
        context.beginPath();
        context.arc(542, 122, 7, 0, 2 * Math.PI, false);
        context.closePath();
        context.fillStyle = '#00FF00';
        context.fill();
    };
    mazeImg.src = "maze.gif";
}
function drawRectangle(x, y, style) {
    makeWhite(currRectX, currRectY, 15, 15);
    currRectX = x;
    currRectY = y;
    context.beginPath();
    context.rect(x, y, 15, 15);
    context.closePath();
    context.fillStyle = style;
    context.fill();
}
请你在迷宫的画布,在脚本的底部添加以下代码:
drawMazeAndRectangle(425, 3); // { 425, 3 } is the position of the blue rectangle on the canvas
currRectX和currRectY代表矩形的位置,并且intervalVar是定时器,这我们将在后面创建变量。
该矩形(),填写()和中风()方法
开始的路径(使用后调用beginPath()方法),您可以使用矩形()方法创建一个矩形。但是如果你只使用矩形()方法,没有绘制矩形。要绘制矩形创建你的画布 -element,你应该使用的填充()或中风()方法以实际绘制的矩形画布。的填充()方法填充的路径,所述行程()方法绘制的路径。
矩形的参数()方法
| 名称 | 类型 | 描述 |
|---|---|---|
该行程()和填充()方法没有参数。 |
||
| X | 数 | 的x坐标,以像素的矩形的左上角的。 |
| ÿ | 数 | 的y坐标,以像素的矩形的左上角的。 |
| W¯¯ | 数 | 矩形的宽度,以像素为单位。 |
| H | 数 | 矩形的高度,以像素为单位。 |
弧()方法
该弧()方法绘制的圆弧画布。绘制弧形后,你应该调用行程()或填()方法。您可以使用此方法来绘制一个圆或圆的一部分。
弧的参数()方法
| 名称 | 类型 | 描述 |
|---|---|---|
| X | 数 | 的x坐标,以像素为单位,所述圆弧的中心点。 |
| ÿ | 数 | 的y坐标,以像素为单位的圆弧的中心点。 |
| 半径 | 数 | 圆弧的半径,以像素为单位。 |
| 由startAngle | 数 | 起始角度,弧度。0是弧圈的3点钟位置(见图片) |
| endAngle | 数 | 结束角度,弧度。 |
| 逆时针 | 布尔 |
真如果弧应逆时针方向(从开始到结束)。可以得出虚假如果弧应该顺时针方向(从开始到结束)绘制。 |
图片:

所述makeWhite()函数
在前面的代码片段中,你看到我用了一个makeWhite()函数。我创造了这个功能我自己。这使得在一个矩形的画布白色。那么,我为什么不使用明确的方法?由于清()方法使得在一个给定的矩形的所有像素透明,这是我们不需要在迷宫。这是的代码makeWhite()函数:
function makeWhite(x, y, w, h) {
    context.beginPath();
    context.rect(x, y, w, h);
    context.closePath();
    context.fillStyle = "white";
    context.fill();
}
移动使用箭头键或WASD矩形
实施接下来的事情就是让能够移动使用箭头键或WASD蓝色矩形。第一步是计算新的X和蓝色矩形的Y坐标。第二步骤是将矩形,如果它可以移动,以显示“恭喜!” 消息,如果蓝色矩形到达终点(绿色圆圈):
 复制代码
复制代码
function moveRect(e) {
    var newX;
    var newY;
    var canMove;
    e = e || window.event;
    switch (e.keyCode) {
        case 38:   // arrow up key
        case 87: // W key
            newX = currRectX;
            newY = currRectY - 3;
            break;
        case 37: // arrow left key
        case 65: // A key
            newX = currRectX - 3;
            newY = currRectY;
            break;
        case 40: // arrow down key
        case 83: // S key
            newX = currRectX;
            newY = currRectY + 3;
            break;
        case 39: // arrow right key
        case 68: // D key
            newX = currRectX + 3;
            newY = currRectY;
            break;
        default: return;
    }
    movingAllowed = canMoveTo(newX, newY);
    if (movingAllowed === 1) {      // 1 means 'the rectangle can move'
        drawRectangle(newX, newY, "#0000FF");
        currRectX = newX;
        currRectY = newY;
    }
    else if (movingAllowed === 2) { // 2 means 'the rectangle reached the end point'
        clearInterval(intervalVar); // we'll set the timer later in this article
        makeWhite(0, 0, canvas.width, canvas.height);
        context.font = "40px Arial";
        context.fillStyle = "blue";
        context.textAlign = "center";
        context.textBaseline = "middle";
        context.fillText("Congratulations!", canvas.width / 2, canvas.height / 2);
        window.removeEventListener("keydown", moveRect, true);
    }
}
如果矩形到达终点,我使用clearInterval()方法来停止计时器(我们将在本文后面设置)。于是,我画“恭喜!上画布,然后,我删除的keydown事件侦听器,因为蓝色的矩形应该不会再移动。
你能移动的蓝色矩形之前,您应该添加的keydown事件侦听器:
drawMazeAndRectangle(425, 3); // this line is already added
window.addEventListener("keydown", moveRect, true); // add this at the bottom of your script
检查蓝色矩形是否可以移动:在canMoveTo()函数
在前面的代码片段中,您看到了canMoveTo()函数。我创造了这个方法来检查蓝色矩形是否可以移动。其背后的逻辑:
-
检查蓝色矩形是否会在的范围内移动
画布 -
如果是这样的情况下,得到了矩形的图像数据与
X = destinationX,Y = destinationY,宽度= 15,身高= 15。我需要15的宽度和高度,因为这是蓝色矩形的大小。 -
使用
了循环来看待所有的像素:如果其中任何有颜色发黑,那么蓝色矩形无法动弹。如果它们中的任何具有颜色石灰,则达到了终点。
这是对码canMoveTo()函数:
function canMoveTo(destX, destY) {
    var imgData = context.getImageData(destX, destY, 15, 15);
    var data = imgData.data;
    var canMove = 1; // 1 means: the rectangle can move
    if (destX >= 0 && destX <= mazeWidth - 15 && destY >= 0 && destY <= mazeHeight - 15) { // check whether the rectangle would move inside the bounds of the canvas
        for (var i = 0; i < 4 * 15 * 15; i += 4) { // look at all pixels
            if (data[i] === 0 && data[i + 1] === 0 && data[i + 2] === 0) { // black
                canMove = 0; // 0 means: the rectangle can't move
                break;
            }
            else if (data[i] === 0 && data[i + 1] === 255 && data[i + 2] === 0) { // lime: #00FF00
                canMove = 2; // 2 means: the end point is reached
                break;
            }
        }
    }
    else {
        canMove = 0;
    }
    return canMove;
}
该getImageData()方法
使用getImageData()方法,你可以得到你的特定区域的图像数据的画布。此方法返回的ImageData对象,而数据属性是包含RGBA像素数据阵列。所以:
-
数据[0]包含的R(红)值先在像素的ImageData -
数据[1]包含在所述第一像素的G(绿色)值的ImageData -
数据[2]包含在所述第一像素的B(蓝)值的ImageData -
数据[3]包含了第一个像素的A(阿尔法)值的ImageData -
数据[4]包含的R(红)值的第二像素的ImageData -
数据[5]包含在所述第二象素的G(绿色)值的ImageData -
数据[6]包含在所述第二像素的B(蓝)值的ImageData -
数据[7]包含了第二像素的A(阿尔法)值的ImageData - 等等
在getImageData参数()方法
| 名称 | 类型 | 描述 |
|---|---|---|
| SX | 数 | 的x坐标,以像素的矩形的左上角的从获取的图像数据。 |
| SY | 数 | 的y坐标,以像素的矩形的左上角的从获取的图像数据。 |
| SW | 数 | 的宽度,以像素为单位的矩形来获得从图像数据。 |
| SH | 数 | 矩形的高度,以像素,以获得从图像数据。 |
实施计时器
下一步骤是实现定时器。要做到这一点,我们使用的setInterval()方法1秒减少时间。如果时间到了,我们白了全帆布,并添加一个红色的“时间到了!” 信息。
 复制代码
复制代码
function createTimer(seconds) {
    intervalVar = setInterval(function () {
        makeWhite(mazeWidth, 0, canvas.width - mazeWidth, canvas.height);
        if (seconds === 0) {
            clearInterval(intervalVar);
            window.removeEventListener("keydown", moveRect, true);
            makeWhite(0, 0, canvas.width, canvas.height);
            context.font = "40px Arial";
            context.fillStyle = "red";
            context.textAlign = "center";
            context.textBaseline = "middle";
            context.fillText("Time's up!", canvas.width / 2, canvas.height / 2);
            return;
        }
        context.font = "20px Arial";
        if (seconds <= 10 && seconds > 5) {
            context.fillStyle = "orangered";
        }
        else if (seconds <= 5) {
            context.fillStyle = "red";
        }
        else {
            context.fillStyle = "green";
        }
        context.textAlign = "center";
        context.textBaseline = "middle";
        var minutes = Math.floor(seconds / 60);
        var secondsToShow = (seconds - minutes * 60).toString();
        if (secondsToShow.length === 1) {
            secondsToShow = "0" + secondsToShow; // if the number of seconds is '5' for example, make sure that it is shown as '05'
        }
        context.fillText(minutes.toString() + ":" + secondsToShow, mazeWidth + 30, canvas.height / 2);
        seconds--;
    }, 1000);
}
在createTimer()函数,我已经创建了一个匿名函数将被称为每一秒。该的setInterval()方法返回一个唯一的ID区间,你可以传递给clearInterval()方法,如果你不希望再匿名函数被调用每一秒。在匿名函数的第一行,我清除了特定范围的帆布:我清除定时器的唯一区域。在这个迷宫,画布被分裂成两部分:在一个部分中,出现迷宫,并在其他部分,出现定时器。
如果秒等于零,我调用clearInterval()方法,因为我想阻止匿名函数每秒的执行。然后,我删除的keydown事件侦听器,因为它不是不再需要移动蓝色矩形(因为时间到了)。于是,我清除整个画布上绘制它“时间到了”。
如果秒尚未等于零,我画上的剩余时间画布。如果剩余时间是10秒以上,剩余时间的颜色为绿色。如果剩余时间大于利特勒或等于10,但大于5,则颜色为橙红色,和如果剩余时间是利特勒大于或等于5秒,那么颜色是红色的。
首先,我们计算剩余分钟。要做到这一点,我们计算的最低值秒/ 60,并获得剩余秒,我们计算秒-分钟* 60如果秒数。5为例,那么我们确保它会显示为05,由前5必要时可通过一个零。
要真正建立计时器,在底部添加此行的脚本的结尾:
drawMazeAndRectangle(425, 3); // added already
window.addEventListener("keydown", moveRect, true); // added already
createTimer(120); // add this line
                  // 120 seconds -> 2 minutes