源代码下载:链接: https://pan.baidu.com/s/1w1KRxzbrj2gGbrX2xQdK0w 密码: xuue

介绍
本文介绍了如何在Android中创建自己的图库。图库是一个显示水平滚动图像列表的视图。我们可以指定选择图库中的图像时要执行的操作。例如,我们可以使用ImageView控件显示更大尺寸的所选图像。
背景
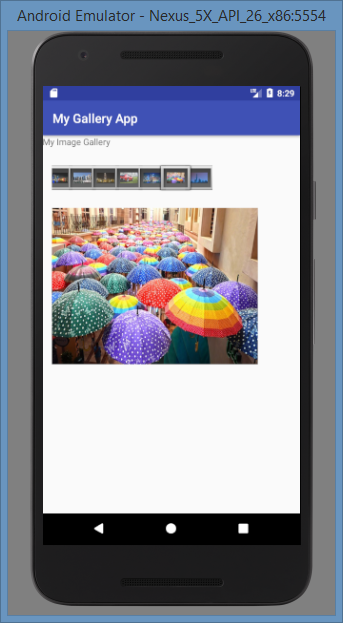
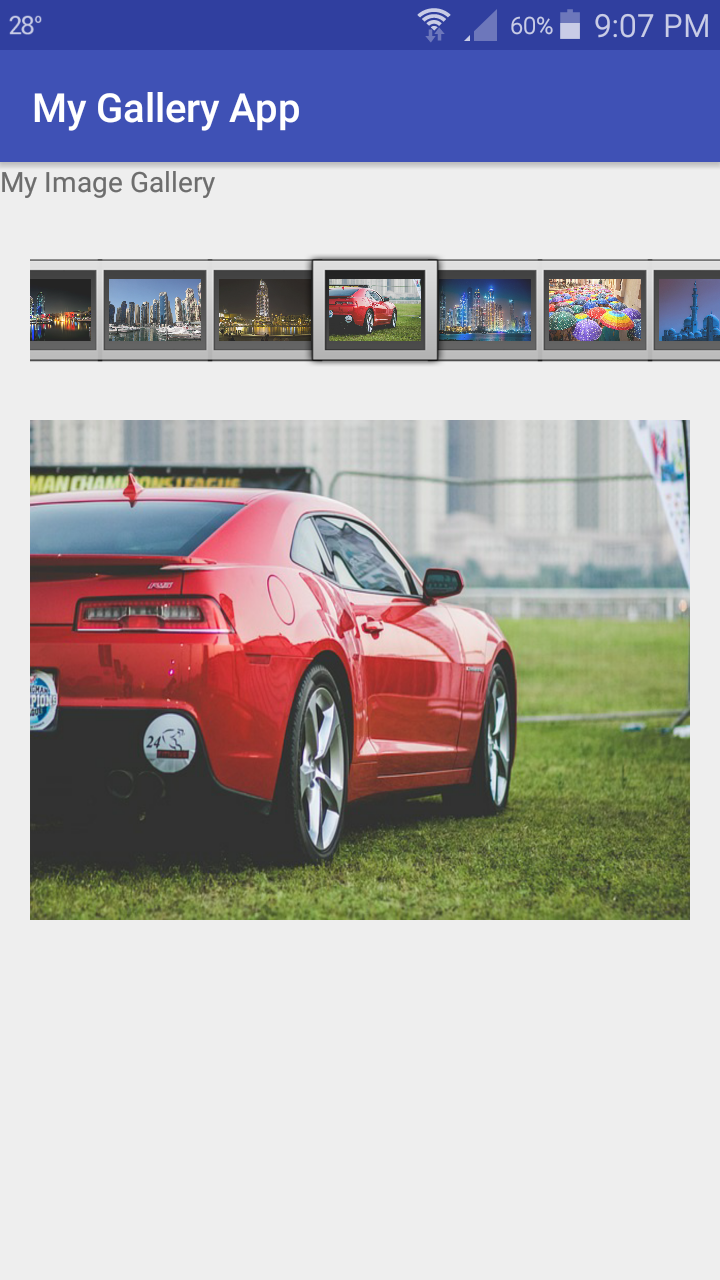
在示例应用程序中,我创建了一个包含固定图像的Gallery。这些图像将复制到res / drawable文件夹中。用户可以水平滚动浏览所有图像。单击图库中的图像会在ImageView控件中显示图像。
使用代码
来自res / drawable文件夹的图像在MainActivity.java文件中引用如下:
Integer[] imageIDs =
            {R.drawable.pic1, R.drawable.pic2,
             R.drawable.pic3, R.drawable.pic4, R.drawable.pic5, R.drawable.pic6, R.drawable.pic7};
activity_main.xml文件中的以下代码使用a创建一个线性布局TextView,Gallery并ImageView控制:
<?xml version="1.0" encoding="utf-8"?>
<LinearLayout xmlns:android="http://schemas.android.com/apk/res/android"

    xmlns:app="http://schemas.android.com/apk/res-auto"

    xmlns:tools="http://schemas.android.com/tools"

    android:orientation="vertical"

    android:layout_width="match_parent"

    android:layout_height="match_parent"

    tools:context="com.example.azim.mygalleryapp.MainActivity">
    <TextView

        android:layout_width="wrap_content"

        android:layout_height="wrap_content"

        android:text="My Image Gallery"/>
    <Gallery

        android:id="@+id/mygallery"

        android:layout_marginLeft="15dp"

        android:layout_marginTop="25dp"

        android:layout_width="match_parent"

        android:layout_height="wrap_content"/>
    <ImageView

        android:id="@+id/myimage"

        android:layout_marginLeft="15dp"

        android:layout_marginTop="25dp"

        android:layout_width="330dp"

        android:layout_height="250dp"

        android:scaleType="fitXY" />
</LinearLayout>
在res / values文件夹中添加一个名为attrs.xml的文件,并在其中添加以下代码:
<?xml version="1.0" encoding="utf-8" ?>
<resources>
    <declare-styleable name="MyGallery">
        <attr name="android:galleryItemBackground"/>
    </declare-styleable>
</resources>
Gallery在MainActivity.java文件中检索该对象,如下所示:
Gallery gallery = (Gallery) findViewById(R.id.mygallery);
gallery.setAdapter(new ImageAdapter(this));
gallery.setOnItemClickListener(this);
在上面的代码中,类的setAdapter()方法Gallery用于使用调用的内部类来指定库的数据和数据格式ImageAdapter。setOnItemClickListener()当单击库中的图像时,该方法注册要调用的回调方法。
以下是ImageAdapter内部类的代码:
public class ImageAdapter extends BaseAdapter
{
     Context ctx;
     int itemBackground;
     public ImageAdapter(Context ctx)
     {
         this.ctx = ctx;
         TypedArray array = obtainStyledAttributes(R.styleable.MyGallery);
         itemBackground = array.getResourceId
         (R.styleable.MyGallery_android_galleryItemBackground, 0);
         array.recycle();
     }
     public int getCount()
     {
         return imageIDs.length;
     }
     public Object getItem(int position)
     {
         return position;
     }
     public long getItemId(int position)
     {
         return position;
     }
     public View getView(int position, View convertView, ViewGroup parent)
     {
         ImageView imageView=new ImageView(ctx);
         imageView.setImageResource(imageIDs[position]);
         imageView.setScaleType(ImageView.ScaleType.FIT_XY);
         imageView.setLayoutParams(new Gallery.LayoutParams(150,120));
         imageView.setBackgroundResource(itemBackground);
         return imageView;
     }
 }
在上面的代码中,ImageAdapter内部类是从BaseAdapter类派生的。在此类的构造函数中,使用该obtainStyledAttributes()方法检索上下文主题中的样式化属性信息并将其存储在TypedArray对象中。该对象的recycle()方法TypedArray用于由稍后的调用者重用该对象。该getView()方法ImageView基于位置返回表示要在图库中显示的图像。该setImageResource()方法将drawable设置为此内容ImageView。该setScaleType()方法指定图像的大小和位置ImageView。该setLayoutParams()方法指定用于排列的布局参数ImageView。该setBackgroundResource()方法设置的背景ImageView。
以下onItemClick()方法是在Gallery中单击图像时调用的回调方法,它在ImageView对象中显示所选图像。
public void onItemClick(AdapterView adapterView,View view,int position,long id)
{
    ImageView imageView=(ImageView)findViewById(R.id.myimage);
    imageView.setImageResource(imageIDs[position]);
}
以下是MainActivity.java文件的完整代码:
package com.example.azim.mygalleryapp;

import android.content.Context;
import android.content.res.TypedArray;
import android.support.v7.app.AppCompatActivity;
import android.os.Bundle;
import android.view.View;
import android.view.ViewGroup;
import android.widget.AdapterView;
import android.widget.BaseAdapter;
import android.widget.Gallery;
import android.widget.ImageView;

public class MainActivity extends AppCompatActivity implements AdapterView.OnItemClickListener
{
    Integer[] imageIDs =
            {R.drawable.pic1, R.drawable.pic2, R.drawable.pic3,
             R.drawable.pic4, R.drawable.pic5, R.drawable.pic6, R.drawable.pic7};

    @Override
    protected void onCreate(Bundle savedInstanceState)
    {
        super.onCreate(savedInstanceState);
        setContentView(R.layout.activity_main);
        Gallery gallery = (Gallery) findViewById(R.id.mygallery);
        gallery.setAdapter(new ImageAdapter(this));
        gallery.setOnItemClickListener(this);
    }

    public void onItemClick(AdapterView adapterView,View view,int position,long id)
    {
        ImageView imageView=(ImageView)findViewById(R.id.myimage);
        imageView.setImageResource(imageIDs[position]);
    }

    public class ImageAdapter extends BaseAdapter
    {
        Context ctx;
        int itemBackground;
        public ImageAdapter(Context ctx)
        {
            this.ctx = ctx;
            TypedArray array = obtainStyledAttributes(R.styleable.MyGallery);
            itemBackground = array.getResourceId
                             (R.styleable.MyGallery_android_galleryItemBackground, 0);
            array.recycle();
        }
        public int getCount()
        {
            return imageIDs.length;
        }
        public Object getItem(int position)
        {
            return position;
        }
        public long getItemId(int position)
        {
            return position;
        }
        public View getView(int position, View convertView, ViewGroup parent)
        {
            ImageView imageView=new ImageView(ctx);
            imageView.setImageResource(imageIDs[position]);
            imageView.setScaleType(ImageView.ScaleType.FIT_XY);
            imageView.setLayoutParams(new Gallery.LayoutParams(150,120));
            imageView.setBackgroundResource(itemBackground);
            return imageView;
        }
    }
}
以下是实际Android移动设备上的应用输出:
兴趣点
我希望这篇文章对于理解如何在Android中轻松创建图库应用程序非常有用。