介绍
目前,RichTextBox的 Windows窗体控件没有分页功能。所以,这个提示将说明如何在实现分页的RichTextBox。
背景
我们将创建一个用户控件,这将有按钮通过各种页面和滚动的RichTextBox控制。
使用代码
因此,我们将创建一个用户控件。
- 它将由两个小组,一小组将包含按钮。其他小组将是一个父面板,其中将包含ButtonPanel和RichTextBox的。
-
按钮面板将包含
一按钮,最后按钮>>按钮和<<键导航。
代码背后的逻辑:
的要求是创建一个固定大小的RichTextBox其中我们能够看到在页面的形式的数据,而不是滚动的RichTextBox。 为了实现应该牢记同分:
-
使
RichTextBox的滚动条为无。这样滚动被禁用。 -
使大小
RichTextBox的预定义和固定。 -
计算
字符数一行可容纳[千万计的空间。 -
计算
行数您的RichTextBox可以容纳。 -
最大的一个RichTextBox的将器。---将{线路数量*字符数}。 -
隐藏 复制代码
// In My case -> lines*maxChar[11*65]
            int maxLength = 715;
-
现在计算的页数,您将需要显示的页面表单中的数据。
通过检查您收到的数据的长度比你的RichTextBox可容纳的最大多。 -
隐藏 复制代码
int noOfPages = 0;

            if (data.Length > maxLength)
            {
                string noPages = Math.Round((Convert.ToDouble(data.Length) / maxLength), 2).ToString();

               //Check If the division yeild the Accurate or the decimal result.
                if (noPages.Contains("."))
                {
                    var noPagesArr = noPages.Split('.');
// If the number after decimal is more than 0, we need to create another page.
                    noOfPages = Convert.ToInt32(noPagesArr[1]) > 0  Convert.ToInt32(noPagesArr[0]) + 1 : Convert.ToInt32(noPagesArr[0]);
                }
                else
                {
                    noOfPages = Convert.ToInt16(noPages);
                }
-
我们还需要照顾
BlankLines(如果有的话),使我们的RichTextBox,可以适当容纳。下面是相同的代码片段。{数字11和65对应于行数和字符数的数目分别。它会根据变化RichTextBox的大小。} -
隐藏 复制代码
//Adjust the pages for blanklines
            if (data.Contains("\r\n"))
            {
                string[] stringSeparators = new string[] { "\r\n" };
                string[] lines = data.Split(stringSeparators, StringSplitOptions.None);
                var count = lines.Where(i => i.Equals("") || i.Equals(" ")).Count();

                maxLength = (11 - lines.Length/count) * 65;
            }
-
因此,一旦计算完成后,我们需要创建一个
字典里面会有相应的页面页码和数据。 -
我们还需要一个索引来查找
当前页面中lodedRichTextBox中。 - 如果我们收到的数据长度为小,因为相比于RichTextBox的能力,那么我们就不用做什么,只是转储数据和禁用按钮。
现在,让我们加入数据的所有作品一起看一下代码作为一个整体。它包含完整的逻辑和将创建分页视图 的RichTextBox的。
隐藏 缩小  复制代码
复制代码
 复制代码
复制代码
 public partial class RTBWithPaging : UserControl
    {
        //A dictionary to save the Page Number with the text.

        private Dictionary<int, string> pgDatadic = new Dictionary<int, string>();
        private int currentPage = 0;

        public RTBWithPaging()
        {
            InitializeComponent();
        }

        /// <summary>
        /// This method will take the full text to be displayed, and in this function, we will create
        /// the page-Data dictionary.
        /// </summary>
        /// <param name="text">Text that you need to show</param>
        public void CalculateRTBPages(string text)
        {
            var data = text.Trim();
            // You can check for your RichTextBox, how much it can accommodate without any scroll
            // and set the maxLength accordingly.
            // In My case -> lines*maxChar[11*65]
            int maxLength = 715;

            //Adjust the pages for blanklines
            if (data.Contains("\r\n"))
            {
                string[] stringSeparators = new string[] { "\r\n" };
                string[] lines = data.Split(stringSeparators, StringSplitOptions.None);
                var count = lines.Where(i => i.Equals("") || i.Equals(" ")).Count();

                maxLength = (11 - lines.Length/count) * 65;
            }

            int noOfPages = 0;

            if (data.Length > maxLength)
            {
                string noPages = Math.Round((Convert.ToDouble(data.Length) / maxLength), 2).ToString();

               //Check If the division yeild the Accurate or the decimal result.
                if (noPages.Contains("."))
                {
                    var noPagesArr = noPages.Split('.');
                    // If the number after decimal is more than 0, we need to create another page.
                    noOfPages = Convert.ToInt32(noPagesArr[1]) > 0  Convert.ToInt32(noPagesArr[0]) + 1 : Convert.ToInt32(noPagesArr[0]);
                }
                else
                {
                    noOfPages = Convert.ToInt16(noPages);
                }
                int pos = 0;


                for (int p = 0; p < noOfPages; p++)
                {
                    //for the last page to accomodate the left characters.
                    if(p == noOfPages-1)
                    {
                        maxLength = data.Length - pos;
                    }
                    var substring = data.Substring(pos, maxLength);

                    //Add the page number and Data to the page.
                    pgDatadic.Add(p, substring);
                    pos += maxLength;
                }

                rtbNotes.Text = pgDatadic[0];
                currentPage = 0;
            }
            else {
                rtbNotes.Text = data;
                btnFirst.Enabled = false;
                btn_Prev.Enabled = false;
                btnNext.Enabled = false;
                btnLast.Enabled = false;
            }

        }

        //Buttons section.

        private void btnFirst_Click(object sender, EventArgs e)
        {
            rtbNotes.Text = pgDatadic[0];
            currentPage = 0;
        }

        private void btnLast_Click(object sender, EventArgs e)
        {
            rtbNotes.Text = pgDatadic[pgDatadic.Count - 1];
            currentPage = pgDatadic.Count - 1;
        }

        private void btnNext_Click(object sender, EventArgs e)
        {
            if (currentPage != pgDatadic.Last().Key)
            {
                rtbNotes.Text = pgDatadic[currentPage + 1];
                currentPage = currentPage + 1;
            }
        }

        private void btn_Prev_Click(object sender, EventArgs e)
        {
            if (currentPage != 0)
            {
                rtbNotes.Text = pgDatadic[currentPage - 1];
                currentPage = currentPage - 1;
            }
        }
    }
}
所以上面的代码讲述的代码视图。
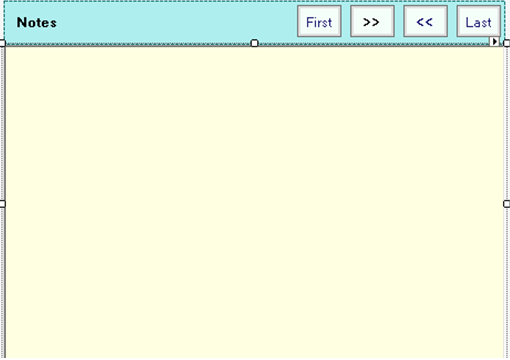
现在,让我们来看看设计师查看:
请记住,使滚动条为无。它不会提供任何滚动。和寻呼可以实现。
隐藏 复制代码
this.rtbNotes.BackColor = System.Drawing.SystemColors.Info;
this.rtbNotes.Dock = System.Windows.Forms.DockStyle.Fill;
this.rtbNotes.Font = new System.Drawing.Font("Microsoft Sans Serif",
12F, System.Drawing.FontStyle.Regular, System.Drawing.GraphicsUnit.Point, ((byte)(0)));
this.rtbNotes.ForeColor = System.Drawing.Color.OliveDrab;
this.rtbNotes.Location = new System.Drawing.Point(0, 40);
this.rtbNotes.Name = "rtbNotes";
this.rtbNotes.ReadOnly = true;
this.rtbNotes.ScrollBars = System.Windows.Forms.RichTextBoxScrollBars.None;
this.rtbNotes.Size = new System.Drawing.Size(453, 286);
this.rtbNotes.TabIndex = 1;
现在的按钮 S,我们可以创建一个4 键 S和可以添加按钮呈S 板,并把RichTextBox的和按钮面板在里面面板用户控件。
隐藏 复制代码
this.pnlButtons.Controls.Add(this.btn_Prev);
this.pnlButtons.Controls.Add(this.btnNext);
this.pnlButtons.Controls.Add(this.btnLast);
this.pnlButtons.Controls.Add(this.btnFirst);
this.pnlButtons.Controls.Add(this.label1);
this.pnlButtons.Dock = System.Windows.Forms.DockStyle.Top;
this.pnlButtons.Location = new System.Drawing.Point(0, 0);
this.pnlButtons.Margin = new System.Windows.Forms.Padding(3, 4, 3, 4);
this.pnlButtons.Name = "pnlButtons";
this.pnlButtons.Size = new System.Drawing.Size(453, 40);
this.pnlButtons.TabIndex = 0
所述面板包含按钮 S和RichTextBox中可以加入。作为显示在图像。

点击第一个按钮将你的第一页。点击“>>”将带你到下一个页面。点击“<<”将带你到前面的页面,点击“ 最后 ”将带你到最后一页。
现在你可以从你的实际的类发送任何文字,并享受分页!!!!