- 下载演示项目 - 43.5 KB
介绍
采用Android编程,可以短信功能集成到自己的Android应用程序。这允许您创建可从Android设备发送和接收短信的Android应用程序。在这篇文章中,我解释如何通过编程发送短信。我也是你展示如何监视SMS消息的状态,例如,在发送邮件时,当它被传递到接收者。
在这里,我假设读者已经使用Eclipse IDE Android应用的基本知识。
背景
Android的需要由应用程序所需要的权限在被指定 的AndroidManifest.xml文件。这可以确保在安装应用程序时,用户知道这是由它所需的权限。此外,它提供了一个选项,用户决定是否要因为这样的应用需要用户招致发送SMS消息的成本安装SMS应用。
使用代码
下面这行需要在AndroidManifest.xml中文件,以允许应用程序发送短信:
<uses-permission android:name="android.permission.SEND_SMS"/>
以下是充分代码的AndroidManifest.xml文件:
<xml version="1.0" encoding="utf-8">
<manifest xmlns:android="http://schemas.android.com/apk/res/android"
      package="com.azim"
      android:versionCode="1"
      android:versionName="1.0">

    <uses-permission android:name="android.permission.SEND_SMS"/>
    <application android:icon="@drawable/icon" android:label="@string/app_name">
        <activity android:name=".SMSSenderActivity"
                  android:label="@string/app_name">
            <intent-filter>
                <action android:name="android.intent.action.MAIN" />
                <category android:name="android.intent.category.LAUNCHER" />
            </intent-filter>
        </activity>

    </application>
</manifest>
SMS应用的用户界面包括两个的EditText字段用于接受分别消息文本和电话号码,以及一个 按钮控制以发送信息。以下是该内容main.xml中的文件:
<xml version="1.0" encoding="utf-8">
<LinearLayout xmlns:android="http://schemas.android.com/apk/res/android"
    android:orientation="vertical"
    android:layout_width="fill_parent"
    android:layout_height="fill_parent"
    >
<TextView
    android:layout_width="fill_parent"
    android:layout_height="wrap_content"
    android:text="@string/hello"
    />
<TextView android:text="Enter SMS Text: " android:id="@+id/textView1"
  android:layout_width="wrap_content" android:layout_height="wrap_content"></TextView>
<EditText android:layout_width="match_parent" android:layout_height="wrap_content"
  android:id="@+id/editText1"></EditText>
<TextView android:text="Enter Phone Number: " android:id="@+id/textView2"
  android:layout_width="wrap_content" android:layout_height="wrap_content"></TextView>
<EditText android:layout_width="match_parent" android:layout_height="wrap_content"
  android:id="@+id/editText2"></EditText>
<Button android:text="Send SMS" android:id="@+id/button1" android:layout_width="wrap_content"
  android:layout_height="wrap_content"></Button>
</LinearLayout>
该SmsManager类用于以编程方式发送短信。这个类是通过使用实例化 静态getDefault()方法如下:
SmsManager sms=SmsManager.getDefault();
该sendTextMessage()的方法SmsManager类用于发送短信如下:
sms.sendTextMessage(phone, null, message, piSent, piDelivered);
该sendTextMessage()方法接受五个参数,如下所示:
-
手机-收件人的电话号码 -
地址-服务中心地址(空默认) -
消息- SMS消息将被发送 -
piSent-意图之前发送邮件时要调用 -
piDelivered-当消息传递给接收方被调用待定意图
挂起的意图piSent和piDelivered创建调用之前如下 sendTextMessage()方法:
PendingIntent piSent=PendingIntent.getBroadcast(this, 0, new Intent("SMS_SENT"), 0);
PendingIntent piDelivered=PendingIntent.getBroadcast(this, 0, new Intent("SMS_DELIVERED"), 0);
该的PendingIntent对象piSent用于通知发件人该邮件已发送和 的PendingIntent对象piDelivered用于通知,当收件人实际收到消息,该消息已送达收件人发送者。
注:该piDelivered的PendingIntent不会在Android模拟器开火。你要测试一个真实设备上的应用程序来查看它。然而,piSent的PendingIntent工作在两个,仿真器,以及一个真正的设备上。
两个广播接收器的目的,smsSentReceiver和 smsDeliveredReceiver,在创建onResume()方法。这些正在使用的注册registerReceiver()方法如下:
registerReceiver(smsSentReceiver, new IntentFilter("SMS_SENT"));
registerReceiver(smsDeliveredReceiver, new IntentFilter("SMS_DELIVERED"));
在每个广播接收器对象时,的onReceive()方法被覆盖检查使用结果代码 getResultCode()方法,并显示相应的信息。
这两个广播接收器对象是未注册在的onPause()方法,如下所示:
unregisterReceiver(smsSentReceiver);
unregisterReceiver(smsDeliveredReceiver);
以下是应用程序的完整源代码:
 复制代码
复制代码
package com.azim;

import android.app.Activity;
import android.app.PendingIntent;
import android.content.BroadcastReceiver;
import android.content.Context;
import android.content.Intent;
import android.content.IntentFilter;
import android.os.Bundle;
import android.telephony.SmsManager;
import android.view.View;
import android.widget.Button;
import android.widget.EditText;
import android.widget.Toast;

public class SMSSenderActivity extends Activity implements View.OnClickListener {
    /** Called when the activity is first created. */
    EditText txtMessage,txtPhone;
    Button btnSend;
    BroadcastReceiver smsSentReceiver, smsDeliveredReceiver;
    @Override
    public void onCreate(Bundle savedInstanceState) {
        super.onCreate(savedInstanceState);
        setContentView(R.layout.main);
        txtMessage=(EditText)findViewById(R.id.editText1);
        txtPhone=(EditText)findViewById(R.id.editText2);
        btnSend=(Button)findViewById(R.id.button1);
        btnSend.setOnClickListener(this);
    }

    public void onClick(View arg0) {
        // TODO Auto-generated method stub
        SmsManager sms=SmsManager.getDefault();
        String phone=txtPhone.getText().toString();
        String message=txtMessage.getText().toString();
        PendingIntent piSent=PendingIntent.getBroadcast(this, 0, new Intent("SMS_SENT"), 0);
        PendingIntent piDelivered=PendingIntent.getBroadcast(this, 0, new Intent("SMS_DELIVERED"), 0);
        sms.sendTextMessage(phone, null, message, piSent, piDelivered);
    }

    public void onResume() {
        super.onResume();
        smsSentReceiver=new BroadcastReceiver() {

            @Override
            public void onReceive(Context arg0, Intent arg1) {
                // TODO Auto-generated method stub
                switch (getResultCode()) {
                case Activity.RESULT_OK:
                    Toast.makeText(getBaseContext(), "SMS has been sent", Toast.LENGTH_SHORT).show();
                    break;
                case SmsManager.RESULT_ERROR_GENERIC_FAILURE:
                    Toast.makeText(getBaseContext(), "Generic Failure", Toast.LENGTH_SHORT).show();
                    break;
                case SmsManager.RESULT_ERROR_NO_SERVICE:
                    Toast.makeText(getBaseContext(), "No Service", Toast.LENGTH_SHORT).show();
                    break;
                case SmsManager.RESULT_ERROR_NULL_PDU:
                    Toast.makeText(getBaseContext(), "Null PDU", Toast.LENGTH_SHORT).show();
                    break;
                case SmsManager.RESULT_ERROR_RADIO_OFF:
                    Toast.makeText(getBaseContext(), "Radio Off", Toast.LENGTH_SHORT).show();
                    break;
                default:
                    break;
                }

            }
        };
        smsDeliveredReceiver=new BroadcastReceiver() {

            @Override
            public void onReceive(Context arg0, Intent arg1) {
                // TODO Auto-generated method stub
                switch(getResultCode()) {
                case Activity.RESULT_OK:
                    Toast.makeText(getBaseContext(), "SMS Delivered", Toast.LENGTH_SHORT).show();
                    break;
                case Activity.RESULT_CANCELED:
                    Toast.makeText(getBaseContext(), "SMS not delivered", Toast.LENGTH_SHORT).show();
                    break;
                }
            }
        };
        registerReceiver(smsSentReceiver, new IntentFilter("SMS_SENT"));
        registerReceiver(smsDeliveredReceiver, new IntentFilter("SMS_DELIVERED"));
    }

    public void onPause() {
        super.onPause();
        unregisterReceiver(smsSentReceiver);
        unregisterReceiver(smsDeliveredReceiver);
    }
}
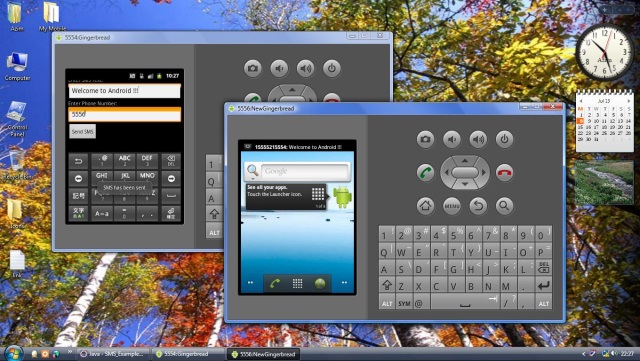
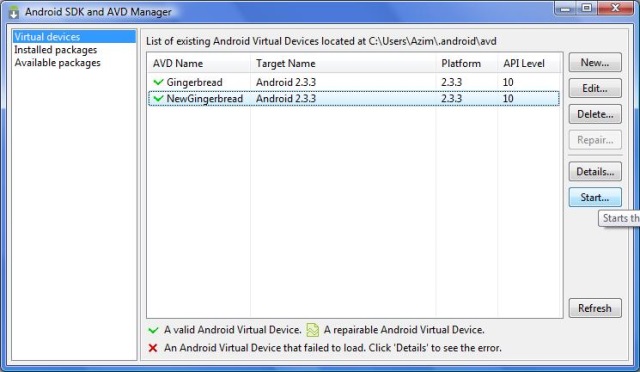
执行在Android模拟器中的应用。这将启动默认的AVD。使用Android SDK和AVD管理选项,推出另一款AVD如下:
在第一个仿真器(5554),输入第二个仿真器(5556)的消息,数,点击发送短信按钮。这将显示在第二个仿真器的消息,并在第一个仿真器发送通知。
兴趣点
编程发送短信的好处是,你可以通过你的应用程序发送动态生成的消息。同时你并不需要真实设备来测试此功能。你可以将它传送到实际设备之前测试模拟器上的应用程序。