本文实例为大家分享了用element+vuedraggable实现图片上传拖拽排序的具体代码,供大家参考,具体内容如下
<template>
  <div class="allUpload">
    <div class="clearfix">
      <div class="wrap">
        <draggable
          v-model="value"
          animation="400"
          class="clearfix"
        >
          <transition-group>

            <div class="left middleCenter" v-for="(item,index) in value" :key="item.id">
              <img :src="item.url" >

              <div class="content-wrap">
                <div class="content middleCenter">
                  <i class="el-icon-zoom-in" @click="showImg(item.url)" ></i>
                  <i class="el-icon-delete" @click="delImg(item,index)"></i>
                </div>
              </div>
            </div>

          </transition-group>


          <div slot="footer" style="float:left">
            <el-upload
              class="wrap"
              list-type="picture-card"
              :action="imgUploadUrl"
              :show-file-list="false"
              :limit="max"
              :on-progress="handlePictureCardPreview"
              :on-exceed="onExceed"
              :disabled="disabled"
              :on-change="onChange"
              :file-list="fileList"
              :multiple="true"
              :on-success="handleSuccess"
              v-if="isUploadBtn"
            >
              <i slot="default" :class="uploadLoading  'el-icon-loading' : 'el-icon-plus'"></i>
            </el-upload>
          </div>
        </draggable>
      </div>

    </div>

    <el-dialog title="查看图片" :visible.sync="dialogVisible">
      <img width="100%" :src="dialogImageUrl" >
    </el-dialog>
  </div>
</template>

<script>
import draggable from 'vuedraggable'
import {imgUpload} from '@/api/upload'
import {MathRandom} from '@/utils/auth'
import { promises } from 'fs'
export default {
  name:'Upload',
  data () {
    return {
      dialogImageUrl: '',
      uploadLoading:false,
      dialogVisible: false,
      disabled: false,
      fileList:[],
      imgUploadUrl:imgUpload(),
      arrs:[]
    }
  },
  props: {
    value: {
      type: () => [],
      default () {
        return []
      }
    },
    max:{
      type:[Number,String],
      default:9
    },
    disabled:{
      type:Boolean,
      default:false
    }
  },
  model:{
    event: 'giveActive'
  },
  computed:{
    isUploadBtn(){
      return this.value.length<this.max
    },
    imgArr(){
      return this.value
    }
  },

  mounted(){
    this.value =[]

    // this.fileList =[]

    const unwatch = this.$watch('value', function(newValue, oldValue){
      console.log(12312323)
      this.fileList = newValue
      unwatch()

    });

  },
  methods: {

    go () {
      this.$emit('giveActive', this.value);
    },
    showImg(url){
      this.dialogImageUrl = url
      this.dialogVisible = true
    },
    delImg(item,index){
      this.$confirm('此操作将永久删除该图片, 是否继续', '提示', {
        confirmButtonText: '确定',
        cancelButtonText: '取消',
        type: 'warning'
      }).then(() => {
        this.value.splice(index,1)
        this.fileList.splice(index,1)
        this.go()
      }).catch(() => {

      });

    },
    onChange(file,fileList){
      this.fileList = fileList
    },

    handlePictureCardPreview(file) {
      this.uploadLoading = true
    },
    onExceed(files, fileList,props){
      this.$message({
        message:`超出最大上传数量,最多可上传${this.max}张图片`,
        type:'error'
      })
    },
    handleSuccess(response, file,fileList) {
      this.uploadLoading =false
      this.urlList(response)
    },
    urlList(res){
      const obj={
        id:MathRandom(),
        url:res.data.data,
        status:'success',
        uid:MathRandom()
      }
      if(this.value.length<this.max){

        this.value = [...this.value,obj]
        this.go()
      }


    }
  }
}
</script>

<style lang='scss' scoped>
  .allUpload{

    .left{
      float: left;
      width: 148px;
      height: 148px;
      border-radius: 6px;
      border: 1px solid #c0ccda;
      margin:0 20px 20px 0;
      overflow: hidden;
      position: relative;
      cursor: pointer;
      &:hover{
        .content-wrap{
          display: block;
        }
      }
      .content-wrap{
        display: block;
      }
      img{
        max-width: 100%;
        max-height: 100%;
        object-fit: cover;
      }
      .content-wrap{
        display: none;
        position: absolute;
        z-index: 99999999;
        width: 100%;
        height: 100%;
        background:rgba($color: #000000, $alpha: 0.4);
        .content{
          width: 100%;
          height: 100%;
          i{
            color: #fff;
            font-size: 18px;
            &:nth-of-type(1){
              margin-right: 10px;

            }
            &:nth-of-type(2){
              margin-left: 10px;

            }
          }
        }
      }

    }

    .wrap{
      float: left;
    }
  }
</style>
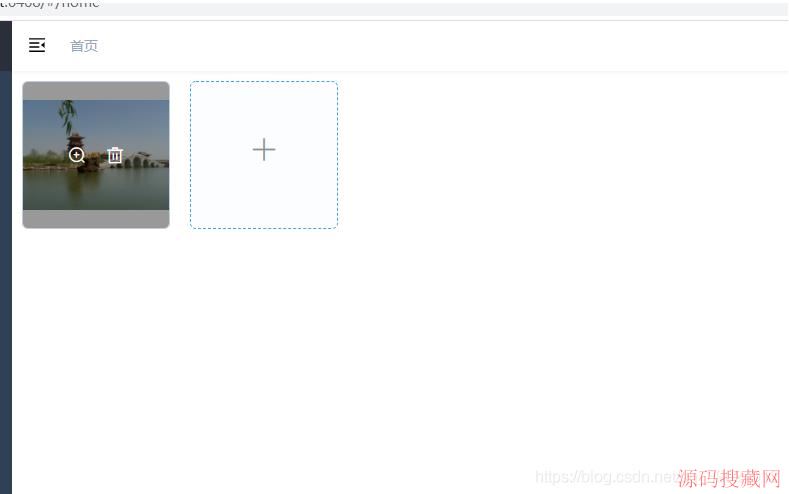
效果图
以上就是本文的全部内容,希望对大家的学习有所帮助,也希望大家多多支持源码搜藏网。